Sunday, November 10, 2013

It's been a while!

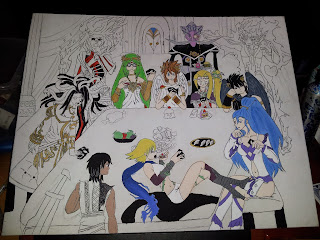
Sorry for the lack of updates!  I've been working on a painting commission for a friend of mine and wanted to keep the progress secret since he can check the blog.

Get ready for a LONNGGGG post!   Here's all the progress pictures from that painting!


I drew each character individually on regular printer paper.  Here's Medusa, Palutena, Pit and Viridi.

Here's the comparision for the two versions of Pandora I did.  The one on the left was the first drawing I did of her and looking at it the composition was very off.  For one, she was looking at the viewer instead of the others and that was more breaking 4th wall than I wanted.  I redrew her and I like it much better, her proportions are better and just all around better.

To put them on canvas I traced over the image on the back using a standard pencil.  I did this with the help of a light box and then just traced over the lines regularly.  Originally I planned to have Hades in the right corner, but decided he should be near Medusa instead of Pandora.

Here they are transferred.


Here's everyone.  There's 11 characters in total in this picture and 3 of them were utter hell to paint.  I'm looking at you, Hades!

For fun, here's how I decided who to draw for the picture.  Sadly I didn't put Gaol in simply because they've only shown up once.  And there was no way in hell I was drawing Thanatos. He'll ruin my beautiful work!

Kitty kept me company while I was working on this. Made herself comfortable on some fleece I had.

I started with everyone that had black and white and then went with the gold.  After this everyone got individual treatment.

Here's 6 of the 11 characters complete.  Close-ups will be at the bottom.
Everyone colored in and background started

background colored in along with most of the things on the table.  Pandora and Medusa's chairs were fixed to make more sense with the perspective, which I suck at. Don't lie to me, I know I suck at it.
All details are complete and the painting is done.  Close-ups now!

Pandora
Pit
Dark Pit ( I had the most trouble with his positioning.  I went through 5 different poses before deciding this is the one I'd do)
Arlon (despite his strange shape he was easy to draw)
Palutena (originally I forgot about her gauntlets)
Phosphora (I love the gradient effect on the scarf, especially since it didn't take long to do)
Magnus  (fun fact, he's the only human at the table)
Viridi (I was very tempted to give her gold accents before looking at her picture again)
Medusa (I had to paint the purple three times over because it wasn't dark enough.  Her skintone was a bit hard to get and almost looks white compared to the background.  It's a very pale purple.  I most enjoyed the snakes)

Pyrrhon  (I really hated drawing him.  His flame hair and flame aura were a pain to draw.  Luckily they look awesome with the gradient so that worked out nicely.  I'm most proud of him and his color scheme.  Btw, this is the first time I've drawn muscular men before >.>)
And lastly, Hades.( I hated the colors for Hades. They were all dark or ridiculously bright.  I hate how the cape looks.  Luckily his hair didn't come out nearly as bad as I thought it was.)


Tuesday, April 30, 2013

Something for the Skylanders

So, after buying into the Skylanders franchise I had tons of figures just crowding up our entertainment center.  It was a mess, I hated it.  So, I decided to make a shelf for them. It started with a large cardboard box I got from work along with a bunch of old posters they had as well.

 I started off by putting them all in the box to see if they would all be able to fit and they did (minus maybe the extra level pieces) so with that I got to work on it.


I made about 18 shelf pieces when I really needed only 16 (plus the large middle piece).  Originally I designed them too wide and with tab that I wanted to put through to the other side through slits.  I did this for the middle but it was a lot of hassle and didn't really prove to add any more resilience.  I had to spend an hour cutting the shelf pieces to fit properly.

I painted all of the shelf pieces ahead of time and started to mark down where I had to put them.  I used hot glue on every edge and it was very sturdy.  I started painting it but then decided to glue all the remaining shelf pieces first.

Progress shot : D

All done!  I sprayed it with clear sealer that had gloss after that. I haven't taken a picture of that, but it's pretty much done.  I do intend to glue something to the back so it can be held up by nails on the wall but for now it's good.


Also, for my gameboy advance games I printed out some fanmade covers from the great people over at thecoverproject.net.  I put them in DS cases and they look wonderful!  I'm looking to do this with more of my games that I don't have any cases for (n64, gameboy, gba, etc)


Annnddd last one for today, an update to the Zero pixel art.  I glued the frame down and need to paint it now.  Unfortunately I messed up a bit with the glue ( i used hot glue on both the plastic frame and the vinyl and it unstuck from the cardboard frame)  so I need to fix that before painting it.

Not bad though, eh?

Comments are welcomed!


Monday, March 18, 2013

More frame work!

Been working on the frame more and more.   What I did was layer about 4 pieces of corrugated cardboard around the picture.  I used smoothed over hot glue on the inside line to make the edges smooth and not look like cardboard.  Picture if this is hard to understand:

I painted it black since the frame will be black:


And I started placing the vinyl sheet on the cardboard.  Vinyl honestly is a bit of a pain to work with.  I had to iron out the wrinkles with a towel in between and that didn't get out the fold marks.  So them I steamed in the shower having to go in and work out the folds with my hands every so often.  And then I made the mistake of gluing too early so I was short on the top.  I had to spend another 45 minutes getting the glue off and soaking it in hot water to get the remainder of it off so it wouldn't look bad.


Getting close to being done though!


Friday, March 8, 2013

Frame time!

So, started on the frame for the Zero picture.  Due to painting the posterboard black, it warped a little.  I had to glue it down to another board to make it straighter.  I also had to use some books to weigh it down too. 
Hooray for spanish books!

I also cut a bunch of cardboard strips for the frame.

Monday, February 11, 2013

ALL DONE!

It's done!  I have finished putting all the stars on the board : D  In the end I needed to make an extra 20 or so stars to fill in a gap I had made.  For future projects I'm going to make sure a grid of some sort is present.  Lots of lines that aren't straight.

Still needs a frame, but that's another thing!


Monday, February 4, 2013

58% and going!


So here's it at 58%.  Probably could've finished at 60 today but I went out for a while.  Still quite a bit to go, but looking good so far!

Saturday, February 2, 2013

Painting!

So, painted those lavender stars and now they show up much clearer.  I also diiiiddddd this!


I painted it all black. The colors show up waaayyyyy better than before!  Here's a comparison shot:

Before:


After:


Much clearer, yes?  I love the end result and it honestly wasn't too hard to brush in between the stars since the hot glue has made them slightly raised.  It took about two hours to paint the black in between all the stars.

And here's some other pictures I didn't include yesterday

Close up of the stars:


Also, made this a couple weeks back for a friend's birthday:

It's an Amaterasu hoodie.  It's made to look like the official one, only I bought a white hoodie and painted it all on myself with fabric paint.  Took maybe 4 hours or so.


Friday, February 1, 2013

So, I finally got to work gluing the stars to the board!  I had to cut the posterboard to the right size, but it's all good.  I used hot glue to adhere the stars to the board, which works better than glue which might strip some of the paint.

Here's the current progress!  Will be putting up some more pictures in a little bit.  This is about 23% complete and has 1,618 stars out of 6,952.

Sadly, the white posterboard kinda drowns out the colors.  I should've bought a black one instead.  Lesson learned, and will take that into consideration for the next one I'm planning.

I had to repaint the dark orange stars as they were blending in with the orange too much ( you can't really see them much from this distance)  and I now have to do the same for the lavender ones that make up the outline of the butterfly.

I kinda want to do something about the background to make it black but with so many stars already on it it's just not worth painting in between and possibly getting black on the stars. I wonder if there's anything I could do that won't damage the stars...

Well, sleep time for now.  Looking forward to more star stuff tomorrow!